
WordPress כוללת ממשק לעריכת תפריטים נוח וידידותי למשתמש, לפעמים נרצה להוסיף אייקון שיאפיין את הקישורים שלנו, המאמר הבא ידגים איך להרחיב את ממשק עריכת התפריטים של WordPress.
הבהרה – במאמר זה אני אתייחס לקטעי הקוד הרלוונטיים, לכן ייתכן ויראה כאילו ישנם חוסרים בקוד, על מנת לקבל את הקוד המלא, אתם מוזמנים להוריד את הקוד מקור בסוף המאמר.
שלב ראשון – יצירת תוסף
בשלב הראשון ניצור את שלד התוסף שלנו לכן ניצור את הקבצים והתיקיות במבנה הבא:
כעת, נפתח את הקובץ add-menu-icon.php ונכניס אליו את הקוד הבא:
<?php
/**
 * Plugin Name: Add Menu Icon
 * Plugin URI: https://www.dorzki.io
 * Description: Adding a menu icon to menu links.
 * Version: 1.0.0
 * Author: dorzki
 * Author URI: https://www.dorzki.io
 * License: GPL-2.0+
 * License URI: http://www.gnu.org/licenses/gpl-2.0.txt
 * Text Domain: dorzki-add-menu-icon
 * Domain Path: /languages
 *
 * @package WordPress
 * @subpackage addMenuIcon
 * @since  1.0.0
 * @version 1.0.0
 * @author  Dor Zuberi <me@dorzki.co.il>
 * @link https://www.dorzki.io
 */


// If trying to access the file directly, die...
if ( ! defined( 'WPINC' ) ) {
  die;
}


/**
 * AI_PLUGIN CONTANTS
 */
if ( ! defined( 'AI_PLUGIN_ROOT_URL' ) ) {
  define( 'AI_PLUGIN_ROOT_URL', plugin_dir_url( __FILE__ ) );
}

if ( ! defined( 'AI_PLUGIN_ROOT_DIR' ) ) {
  define( 'AI_PLUGIN_ROOT_DIR', plugin_dir_path( __FILE__ ) );
}

if ( ! defined( 'AI_PLUGIN_VERSION' ) ) {
  define( 'AI_PLUGIN_VERSION', '1.0.0' );
}


/**
 * AI_PLUGIN CLASSES
 */
require_once( ABSPATH . 'wp-admin/includes/nav-menu.php' );
require_once( AI_PLUGIN_ROOT_DIR . 'classes/edit-menu-add-icon-walker.php' );
require_once( AI_PLUGIN_ROOT_DIR . 'classes/display-menu-add-icon-walker.php' );
require_once( AI_PLUGIN_ROOT_DIR . 'classes/add-icon.php' );


/**
 * INITATE AI_PLUGIN
 */
$plugin = new addIcon();
שורות 3 עד 12 // הגדרת התוסף, שם, גרסא, מפתח התוסף וכד׳.
שורות 24 עד 26 // אנחנו בודקים אם מנסים לגשת לקובץ הזה ישירות, במידה וכן, אנחנו נעצור את הריצה של הסקריפט.
שורות 50 עד 53 // אנחנו קוראים לקבצי התוסף השונים ולקובץ מערכת של WordPress.
שורה 60 // אתחול של התוסף.
שלב שני – הוספת שדה בטופס עריכת קישור
קישור הפונקציות
כלל הפונקציות שנבנה כאן, נצטרף לקשר ל-Action-ים ול-Filter-ים שונים, נעשה זאת ע״י שימוש בפונקציית ה-constructor:
public function __construct() {

  // Actions
  add_action( 'wp_setup_nav_menu_item', array( &$this, 'retrieve_menu_icon_field' ) );
  add_action( 'wp_update_nav_menu_item', array( &$this, 'save_menu_icon_field' ), 10, 3 );
  add_action( 'wp_edit_nav_menu_walker', array( &$this, 'register_menu_edit_walker' ), 10, 2 );
  add_action( 'wp_nav_menu_args', array( &$this, 'register_menu_display_walker' ), 10, 2 );
  add_action( 'wp_enqueue_scripts', array( &$this, 'register_plugin_assets' ) );
  add_action( 'plugins_loaded', array( &$this, 'register_plugin_i18n' ) );

  // Filters
  add_filter( 'menu_edit_add_fields', array( &$this, 'add_menu_icon_field' ), 10, 5 );

}
איחזור ערך השדה
הפונקציה הראשונה שנבנה היא הפונקציה אשר אחראית על איחזור השדה של האייקון מהמסד נתונים.
public function retrieve_menu_icon_field( $menu_item ) {

  $menu_icon = get_post_meta( $menu_item->ID, '_menu_link_icon', true );

  $menu_item->link_icon = ( ! empty( $menu_icon ) ) ? $menu_icon : ''; // Possible to replace with default value.

  return $menu_item;

}
מכיוון שלינקים בתפריט נשמרים בטבלת wp_posts, נשתמש בפונקצייה get_post_meta על מנת לאחזר את הערך השמור. לאחר מכן אנחנו בודקים האם קיבלנו בחזרה ערך, במידה וכן נאחזר אותו, במידה ולא, נחזיר ערך ברירת מחדל (נכון לעכשיו ערך ריק).
שמירת ערך השדה
הפונקציה הבאה תקבל את הערך שהמשתמש בחר ותשמור אותו במסד הנתונים.
public function save_menu_icon_field( $menu_id, $menu_item_id, $menu_item_data ) {

  if( is_array( $_REQUEST['menu-item-icon'] ) ) {

    $link_icon = $_REQUEST['menu-item-icon'][ $menu_item_id ];

    update_post_meta( $menu_item_id, '_menu_link_icon', $link_icon );

  }

}
בדומה לפונקציה הקודמת, אנחנו נשמור את הערך ע״י שימוש בפונקציה update_post_meta, מה שטוב בפונקציה הזאת, זה שבמידה ולא קיים ערך במסד, הוא יצור חדש וישמור את הערך.
הגדרת Walker לטופס עריכה
WordPress משתמשת במחלקות (Class) על מנת להגדיר איך אנחנו רוצים שהתפריט יודפס, לכן על מנת להוסיף את השדה שלנו נצטרך לבנות Walker מיוחד אשר יאפשר לנו להזריק את השדות שלנו לטופס יצירת / עריכת קישור בתפריט.
כעת עלינו ליצור את ה-Walker של התפריט עריכה, נעשה זאת ע״י הרחבת ה-Walker של טופס עריכת הקישור הנקרא Walker_Nav_Menu_Edit.
class editMenuAddIconWalker extends Walker_Nav_Menu_Edit {

  /**
   * Output the item form.
   *
   * @param  string   &$output  the item form.
   * @param  object   $item     the item data.
   * @param  integer  $depth    the item depth.
   * @param  array    $args     the menu args.
   * @since  1.0.0
   */
  function start_el( &$output, $item, $depth = 0, $args = array(), $id = 0 ) {

    $item_output = '';

    parent::start_el( $item_output, $item, $depth, $args );

    $new_fields = apply_filters( 'menu_edit_add_fields', '', $item_output, $item, $depth, $args );

    if( ! empty( $new_fields ) ) {
      $item_output = preg_replace( '/(?=<div[^>]+class="[^"]*submitbox)/', $new_fields, $item_output );
    }

    $output .= $item_output;

  }

}
שורה 16 // מכיוון שאנחנו דורסים פונקצייה של ה-Walker, נקרא למחלקת האב ממנה ירשנו על מנת לקבל את השדות הדיפולטיביים של WordPress.
שורה 18 // נפעיל על השדות פילטר שיצרנו על מנת שנוכל להזריק את השדה החדש או את השדות החדשים שנרצה להוסיף בעתיד.
שורה 21 // אנחנו נזריק את השדה שלנו ממש לפני הכפתור שמירה.
כעת עלינו להזריק את ה-Walker שבנינו לעמוד עריכת תפריטים על מנת שהשדה החדש שיצרנו יוצג לנו.
public function register_menu_edit_walker( $walker, $menu_id ) {

  return 'editMenuAddIconWalker';

}
בניית השדה לבחירת אייקון
השלב האחרון בפאנל הניהול הוא בניית השדה שלנו על מנת שנוכל להציג אותו בטופס עריכה.
public function add_menu_icon_field( $new_fields, $item_output, $item, $depth, $args ) {
// Get the current icon.
$currentValue = get_post_meta( $item->ID, '_menu_link_icon', true );
// The field schema
$new_fields .= '<p class="additional-menu-field-icon description description-thin">';
$new_fields .= ' <label for="edit-menu-item-icon-' . $item->ID . '">' . __( 'Icon', 'dorzki-add-menu-icon' ) . '<br>';
$new_fields .= ' <select id="edit-menu-item-icon-' . $item->ID . '" class="widefat code edit-menu-item-icon" name="menu-item-icon[' . $item->ID . ']">';
foreach( $this->icons as $class => $name ) {
$new_fields .= ' <option value="' . $class . '" ' . selected( $currentValue, $class, false ) . '>' . $name . '</option>';
}
$new_fields .= ' </select>';
$new_fields .= ' </label>';
$new_fields .= '</p>';
return $new_fields;
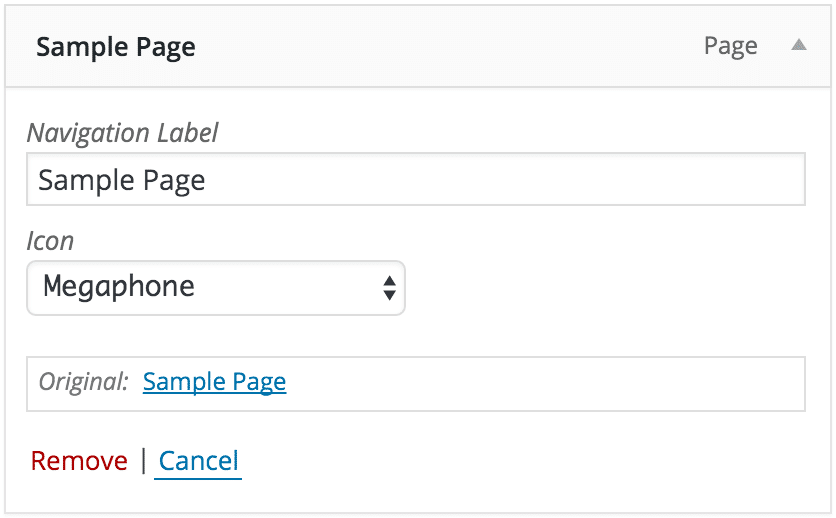
}כעת, אם נכנס למסך עריכת תפריטים נוכל לראות שהתווסף לנו שדה של בחירת אייקון:
שלב שלישי – הצגת האייקון בתבנית
החלק האחרון שנשאר לנו לעשות הוא להציג את האייקון בתבנית שלנו, על מנת לבצע זאת נשתמש שוב ב-Walker מיוחד, אך הפעם אנחנו נרחיב את Walker_Nav_Menu.
class displayMenuAddIconWalker extends Walker_Nav_Menu {

  /**
   * Output the menu item on the front-end.
   *
   * @param  string   &$output  the item output.
   * @param  object   $item     the item data.
   * @param  integer  $depth    the item depth.
   * @param  array    $args     the menu args.
   * @since  1.0.0
   */
  function start_el( &$output, $item, $depth = 0, $args = array(), $id = 0 ) {

    global $wp_query;
    $indent = ( $depth ) ? str_repeat( "\t", $depth ) : '';

    $class_names = $value = '';

    $classes = empty( $item->classes ) ? array() : (array) $item->classes;

    $class_names = join( ' ', apply_filters( 'nav_menu_css_class', array_filter( $classes ), $item ) );
    $class_names = ' class="'. esc_attr( $class_names ) . '"';

    $output .= $indent . '<li id="menu-item-'. $item->ID . '"' . $value . $class_names .'>';

    $attributes  = ! empty( $item->attr_title ) ? ' title="'  . esc_attr( $item->attr_title ) .'"' : '';
    $attributes .= ! empty( $item->target )     ? ' target="' . esc_attr( $item->target     ) .'"' : '';
    $attributes .= ! empty( $item->xfn )        ? ' rel="'    . esc_attr( $item->xfn        ) .'"' : '';
    $attributes .= ! empty( $item->url )        ? ' href="'   . esc_attr( $item->url        ) .'"' : '';

    $prepend = '<span>';
    $append = '</span>';
    $description  = ! empty( $item->description ) ? '<span>'.esc_attr( $item->description ).'</span>' : '';

    if($depth != 0)
    {
      $description = $append = $prepend = "";
    }

    $item_output = $args->before;
    $item_output .= '<a'. $attributes .'><span aria-hidden="true" class="' . $item->link_icon . '"></span>';
    $item_output .= $args->link_before .$prepend.apply_filters( 'the_title', $item->title, $item->ID ).$append;
    $item_output .= $description.$args->link_after;
    $item_output .= '</a>';
    $item_output .= $args->after;

    $output .= apply_filters( 'walker_nav_menu_start_el', $item_output, $item, $depth, $args );

  }

}
אין מה להיבהל מהקוד, רובו מועתק מה-Walker אב שממנו אנחנו יורשים, השורה היחידה ששונה ורלוונטית אלינו היא שורה מספר 41, אשר בה אנחנו מדפיסים את האייקון ששמור לאותו הפריט בתפריט.
כל שנותר לעשות הוא לבצע הזרקה של ה-Walker להגדרות התפריט, אך אנו נעשה את זה בצורה חכמה, כלומר, רק אם לא הוגדר Walker בתבנית, נשתמש ב-Walker שלנו.
public function register_menu_display_walker( $args ) {

  if( empty( $args['walker'] ) ) {
    $args['walker'] = new displayMenuAddIconWalker;
  }

  return $args;

}
סיכום להורדת הקוד המלא
הוספת האייקון לתפריט הוא פיצ׳ר שנדרש ממני בעבודה כאשר עבדתי על אחד הפרוייקטים, עם שינויים קלים בקוד ניתן להוסיף או להגדיר שדות אחרים שנרצה.